Cyber-Secure Advanced PTZ Features
This camera that we're looking at here is our 300-foot PTZ in the Cyber Secure series. It comes with auto tracking, antifog, de-ice. It's a very comprehensive camera, very robust. This has some pretty cool features too, especially with the auto-tracking, as well as how you use the PTZ in the Cyber secure line that we're going to show you here today.
(00:31)
When you're looking at the NVR or you're looking at the software, specifically the software here is what we're using. But the same functionalities are on the NVR. You can go to the PTZ controls, and here you've got your traditional up, down, left, and right directional arrows that you can click on, as well as a zoom focus that you can just click and hold and zoom in and out if you need to.
(00:57)
These cameras also feature a 3D PTZ control, so if you click that, the control skiing gets a lot easier. You just click. If you draw a box from the top half of the screen as we do here, the camera will zoom in on that box. And if you draw it again, it'll zoom in even further. And then you can draw to the right side of the screen and it'll move it to the left side of the screen. It'll move to the top of the screen. It'll move it. And if you'd like to zoom out, you draw from the bottom part of the screen. You can draw right in the middle, so if we zoom in here, so if we draw from the top and click and hold going down, then it'll zoom in. If we draw from the bottom and click and hold going up, then it'll zoom out. Then the smaller the box that you draw, the more it zooms in. And then once it reaches the end of its zoom capabilities, it'll just move toward the box that you draw.
(02:10)
You've also got your standard PTZ tours and presets. We would just save this preset number one. We'll call it the water tower. Then if we move the camera, once it's saved, you've got the name down here, you can just hit the go-to preset button and it'll go right back to that preset where you saved it. Once you have enough presets, three or four presets that you have saved, you can start a patrol. You can add your presets here. We would do route number one, patrol, and then we can either save new presets here by clicking on the screen, or we can just add presets that are already saved from previous operations. We'll do this as preset. And then we simply add all the presets that we need to the tour here. Once you have all your presets, it will just tour through all of them and cycle through.
(03:47)
We've got three presets that are added in. That's going to pause on each preset for 10 seconds. Here we can move them up or down in the list. So if you put all your presets in a list and you want to modify the order, you don't have to record anything again. You can just shuffle them up or down on the list here until they're in the right order. We've got the patrol save number one. When we play it, it'll just cycle between the presets that are saved in the patrol and it'll pause on each preset for 10 seconds.
(04:23)
Then we've got auto guard, which is our auto-tracking functionality. It wants to be linked to a home point. So if we save this as a preset, once it's done tracking motion, this is where it will return to. We enable the auto guard, preset auto home. To access the advanced functionality of the auto-tracking, we'll need to log directly into the camera, or locally on the NVR you can control these options, but this is a software tutorial, so we're going to do it from the camera itself.
(05:18)
Once we're logged into the camera here, we can see one of our guys checking his oil and it's tracking him. What we do is we go to setup, intelligent, and auto-tracking. Here you can see all the intelligent functions that the camera's capable of: line crossing, if someone enters or leaves an area, intrusion, so you draw a square and if anything comes in or out, face detection, people counting, crowd density monitoring, and auto-tracking. That's been enabled because it's on guard mode, so we hit the gear here. Now we can change the different settings here for the auto-tracking. Right now, as you can see, we've got it on motor vehicles, non-motor vehicles, which would be like a bicycle or like a scooter, one of those electric scooters that people use, or a pedestrian. Each one has different settings. Right now we're on motor vehicle.
(06:16)
What I'm going to do here, I'm going to turn off the auto-tracking. And then for motor vehicle, we have a minimum size and a maximum size. Basically, the minimum size is how small it has to be in order to trigger and the maximum size is how large it has to be. The maximum size should be the whole screen, that way it'll keep track if it goes right in front of it. The minimum size is basically how far out. If you're tracking vehicles at a distance, they need to be at least this large in order to set off the tracker. It doesn't matter where you place this, it'll still track anywhere here on the scene. This is just because they've got a handy little guy that they give you. If you're tracking vehicles further off in the distance like if we wanted to track these little cars up here, we would have to shrink this quite a bit and then it'll track any car that's at least that size. But since we're just doing our lane here, we're just going to keep that at right around the same size as we had it.
(07:21)
Same thing with non-motor vehicle. We get a minimum size and a maximum size. If you want to track a bicycle or a scooter, it doesn't necessarily have to be that large, but you would just adjust the size here depending on where you want to actually track it at. Again, this is just a guide that you can put over an object and size up. It's not an area that you're telling it to detect motion in. It will track motion across the entire screen.
(07:55)
And then pedestrian, we want to keep that pretty small because people are a lot smaller than vehicles. The maximum size, nobody's ever going to be this large unless they were standing right in front of the camera, so maximum size I would recommend keeping across the entire screen. Minimum size is how far away you want to start tracking these people or these vehicles or these bicycles or whatever it is that you're trying to track with this camera.
(08:18)
I'm going to turn the tracker back on. Then we've got a plan, so you can unarm the tracker at specific times. For example, if you don't want it to track people from midnight to six in the morning, you can just edit that schedule here so that from zero to six it's unarmed, and then from six on, it's armed, basically whatever you want to do here with the schedule. You just click arm to arm it and click and drag or you click arm to disarm it and click and drag. It's very straightforward, just like setting the schedule on the NVR. And then it'll only track during those allotted times that you've allowed for it.
(09:06)
Then back to the tracking here, we've got a tracking option right here that we can select. This gives you fine control over how the camera tracks. Right now we have it on a 30-second timeout, which means it'll track motion for 30 seconds and then go back to its home preset, its home position. You can continuously track and bypass any timeout and it will just track until the object is too small or no longer in view. For example, we have the PTZ mounted against a wall, so at some point if it goes around the building here, we're going to lose track of it because we've got this wall in the way, so it would stop tracking at that point. Otherwise, if you have it mounted on a parapet mount or on a pole, you can do continuous tracking, and as long as it's not too small and too far away, it should keep track of them no matter where they go.
(10:06)
Then you've also got a zoom option, which basically means we have it set to auto, so when it sees somebody, if they're further away, it'll zoom in and then enlarge them. You can turn that off and keep the current amount of zoom on there if you don't want it to zoom in and out at all. You can just keep it at the same constant level of zoom and then you don't have to worry about if it zooms in and misses somebody. It's usually very good with the zoom. This is more of a personal preference. The small the object, the harder it is to see, so we usually recommend you leave that on auto so it can zoom in and obtain a face or as much detail about the vehicle or the person that it is that you're tracking.
 (CS-PTZ300) 3K Long Range Pan Tilt Zoom , Human Tracking
- - PTZ Motion Tracking
- - 4.8-120mm Zoom Lens
- - All Advanced AI Features
- - 328ft COLOR Night Vision
Special Price $989.00 Regular Price $1,249.00-
-
-
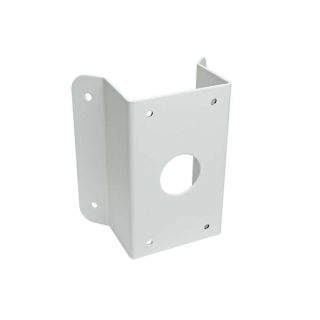
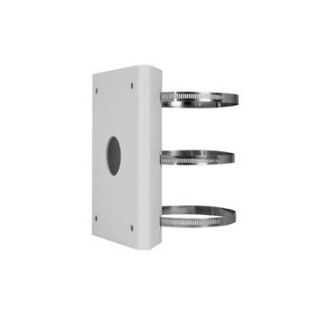
- CS-Pole Mount Bracket
- Mounting for:
- - CS-PTZ300
- - Universal Pole Mount for any Cyber Secure Camera when using correct camera mounting box.
$45.00 -