How to Deploy a Sentry Surveillance Trailer in 10 Minutes
Step by Step
Find Level Location
The area should be a reasonably level area, approximately 10x12ft. It should have easy access for deployment. Gravel, dirt, pavement, and concrete are normal platforms. Avoid sand when possible, deploying on sand can be difficult and with the likely hood of the trailer settling into the sand, the trailer may have to be leveled periodically.

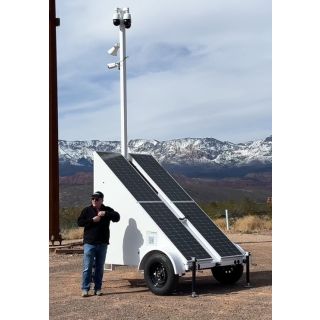
Position the Trailer True South
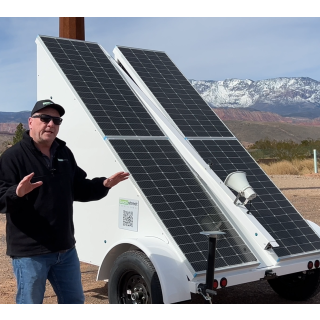
Position the trailer so the solar panels are facing true south. True south can be found using an iPhone and the compass app. For the compass to show true south, you will have to access the setup on the phone, select the compass tool and select the default mode as “true north”. Locate the direction of true south and maneuver the trailer so the solar panels are facing that direction. Positioning does not have to be perfect but should be close. The solar panels will not need angle adjustments, they are set at 40 degrees which is optimal for 80-90% of North America. Detach the trailer from the vehicle using the tongue wheel strut for support.

Deploy the Leveling Struts
The trailer is equipped with (4) leveling struts. If you are deploying on dirt or soft soil its best to give the strut base a platform to stand on such as a piece of construction wood or a rocks. The point is the trailers are heavy and they can sink into soft ground over time making the mast and cameras unlevel.
Level the trailer using all four struts. It is ok if one or both wheels leave the ground while leveling, but it is best to leave some weight on the wheels so there are six points of contact to the ground rather than just four.

Using the leveling bubbles located on the tongue of the trailer, adjust the struts so the trailer is level left-to-right and front-to-back. If the trailer is not level, then the mast is not level and the PTZ cameras may not operate properly.
Access to Keys

The keys to the camera storage box and controls are found in the combination key box mounted on the side of the camera storage box (located on the tongue of the trailer). The key box is a combination code lock. The code is provided in the trailer’s documents provided at the time of purchase.
Slide the cover protecting the key box combination tumblers down, set the four-digit code and push the small button on the left down which will release the door to the compartment. The keys for the camera storage box and controls are enclosed. Note: You can leave the keys in the camera storage box, lock it, and put only the camera storage key in the key lock box.
Preparation
Remove the access panel on the front right of the trailer using the Allen Wrench found in the camera storage box. There are six quick connect Allen Plugs, insert the Allen Wrench, and turn half a turn, the plug will release allowing you to remove the plug. Suggestion: Keep the plugs in the camera storage compartment so they are not lost.

Mounting Cameras to the Mast

Release the rubber security strap securing the mast to the trailer. It is found halfway up the mast on the right while facing the solar panels. The crank assembly is usually located inside the trailer at the base of the mast, but some models have it located on the outside and some are motorized. Attach the crank handle (same one used to operate the tongue wheel) to the spindle and turn the crank several turns until the mast has risen 2-3 feet. Position the mast so it is at a comfortable height to mount the camera assembly to the mast.
Remove the cameras from the storage box, use both hands; the unit is made of steel. Hold the camera assembly close to the mast and attach the weatherproof RJ45 fittings to the ports on the mast. Slide the assembly onto the mast and secure it with the cotterless hitch pin (you may have to wiggle and tap the pin to seat it in on the opposite side).

LPR Cameras (License Plate Recognition)
If the unit is to be equipped with an LPR camera, secure the camera to the mast with the star handle fasteners (found in the storage box) and connect the cameras cable to the weatherproof network port located on the side of the mast. The camera can be mounted on either side of the mast and the camera mount adjusts 180 degrees allowing for 360 degree aiming of the LPR camera.

Mast Deployment
With the cameras secured to the mast, continue to deploy the mast by turning the crank handle clockwise until the mast is deployed. Crank the handle until the mast is vertical and seated securely against the rubber pad located at the base of the mast support. Apply approximately five pounds of pressure on the handle to leave sufficient tension to lock the mast in place. Once fully deployed, remove the handle crank and place back into the storage box. Check the leveling of the trailer and make any leveling adjustments if any are needed.


Powering On
There are two control switches, one powers up the entire system and the other controls the blue LED strobe lights. These switches are located in the storage box. Switch both to on and wait for the systems to power up. The cameras will run through a five-minute self-check and the entire system will be operational. By default, the system will automatically start recording all cameras.
Accessing the System
Using the Cyber-Secure app or client software, a user will have immediate access to the camera’s view and control for adjusting each camera’s default viewing position. The app is available as iPhone and Android apps. To locate the app search for Cyber Secure by Backstreet Surveillance. Download and install on device, then call our support center for access to the system. 1-800-431-3056 Option 3.

Locking the Leveling Struts
Install the locking straps around the leveling struts, they are steel cables secured with combination locks which operate on the same code as the key lock box. Secure the straps around all four struts and their handle so the handle cannot be turned.
Tongue Lock
Install the tongue lock and put the key in the key box or the storage box. Remove the tongue wheel/strut and take with you so it cannot be vandalized.

Locking Up
Once you have confirmed the cameras are live on your phone app, lock the trailer up. Secure the access panel, put the crank handle back in the storage box, place the keys back in the key box.

Initial Setup
If this is the first deployment for the trailer, we recommend contacting our support department for help customizing the operation of the system for that deployment. Our support center will help downloading the mobile app and grant access to the trailer.
Blue Strobe Lights
The manual toggle switch located inside the storage box operates the flashing blue lights on the trailer. We recommend they be operational during deployment, even during the day. People equate the system to be operational if they see flashing blue lights (excellent deterrence). For transportation, the toggle switch must be turned off, so the lights are not flashing, and traffic laws are not violated.

Preparation for Travel
- • Power the system down
- • Drop the mast (don’t let the cameras hit the trailer)
- • Remove the cameras & store them
- • Secure the mast
- • Switch the leveling struts to up position for travel
- • Remove the tongue lock
- • Store all parts in storage box
- • Lock storage box & put keys back in key lock box
- • Connect towing vehicle to trailer
- • Test taillights
- • Ready for travel
Included
- (1) Crank Handle
- (4) Keys
- (6) Extra Allen Plugs
- (1) Tongue Lock
- (4) Combination Pad Locks
- (4) Steel Strut Cables
- Unlimited Factory Phone Support
- 5 Year Equipment Warranty
Optional Services
Data Cell & Satellite Service – The trailer communicates with either a data cell service or satellite link. We provide these services, but the customer has the option of providing their own if they are not using our monitoring services. Please contact us to verify compatibility.
Live Monitoring and Dispatch – The trailer can be monitored live and provides real time deterrence and dispatch services. Contact our service center for pricing.
Vandalism Insurance – The trailer and all components is covered under our 5 year warranty. This covers component replacement if any item should fail due to normal operation or a manufacturer’s defect. The warranty does not cover intentional damage or vandalism. If you are concerned about damage due to vandalism please call our service center, we will be glad to quote a monthly insurance fee which will cover all vandal related damage to the trailer.
 Sentry-Pro Monthly Trailer RentalMonth to Month Rental
- Solar powered surveillance trailer. Monthly fee includes: rental, video monitoring & dispatch, 4 weeks of 4K 30fps video on-demand, cellular data service.
$1,899.00- Sentry-Pro Mobile Surveillance TrailerCustomers #1 Choice
- Compact, high performance, 4K Video Surveillance Trailer. Supports (4) PTZ Cameras & 120dB Talk-down Speakers. Solar-powered with (4) days of battery backup.
$34,999.00 - Sentry-X Solar Trailer Generic PlatformYou Provide the CCTV & Comms
- 800W Charging, 400Amps Backup, 18ft No-sway Mast, Supports any IP Device, 6-8hr Charge, 3-5 Day Battery, 3500lb Wheelbase. Outfit it your way!
$27,999.00 - Sentry All-Terrain Surveillance TrailerOff-Grid Surveillance Trailer
- When the road in...is not a road. Or when power & communication options are nonexistent, this self-sustaining surveillance trailer is your solution.
$49,999.00 - Hanwha-Pro Solar Surveillance TrailerHanwha Vision Platform
- Hanwha Camera Equipped Surveillance Trailer. With (3) Hanwha PTZ Cameras & (1) 110dB Talk-down Speaker. Solar-powered with (4) days of battery backup.
$39,999.00